Hello there, I am DementedHero.A lot of you may know me, as a pixel artist.
Me, being as critically minded as I am, look at a lot of RuneScape pixel art with a slight taste of disgust. People scribble some awfully designed characters in paint, fill the spaces with the paint bucket tool, flop on a background, and call it a sig. They forget about shading, composition, colours, and all the things you need to take in account.Sure, I'm no professional pixel artist, but I can teach the most of you one or two things.
I've made a small tutorial about a year ago, for pixelling a simple character, though this tutorial was Dutch and mainly aimed at one specific forum.
Right now, I am making a complete signature tutorial.
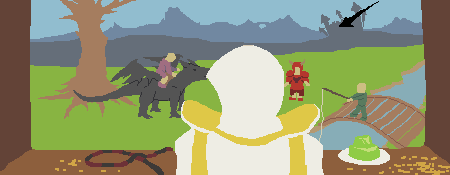
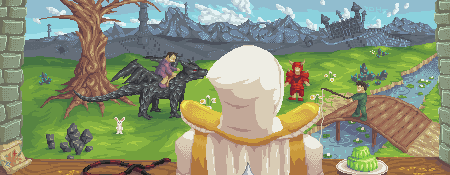
In this tutorial I will remake the signature I've just finished making for a customer.
This one to be precise:
I will explain the used techniques, the thoughts behind certain things, and I will show to finish off a sig.
This sig is partly experimental for me. I’ve used some techniques I’ve never used before, like the way I made the clouds, the blotching of colour, etc. Some new things for me.
A warning:This tutorial is a big read. It has alot of images and a big load of text.
Please take your time for this, as the sig took alot of time. Quality takes time.
The things you will need for this tutorial:A program capable of using a 1 pixel-sized, non anti-aliased pencil tool or something similar. As long as you can place pixels without anti-aliasing.
I myself use PaintShopPro7. Quite an old program, but I got used to it, and have been working with it for a load of years. I prefer this program over paint because of a few features.
Layers.Very handy. I make the different parts of the sig on different layers, so I can move around and erase certain parts very easily, without having to re-pixel the whole area behind it.
The zoom function.Psp7 can zoom up to 32:1. That's way more then you will ever need. You zoom with the scroll button, so I don't have to select another tool to zoom.
HotkeysI use things like control+click alot (eyedropper), I use control+z and control+alt+z a lot, which are Undo and Redo.
Plus, a few more things, like the option to edit your pallet. (Reduce colours to x, then edit pallet.)
You are also going to need a brain. Reading this probably means you have one.
Your brain needs to be a bit creative though. You need to be able to imagine things, you have to be able to see the real 3d shape of the things you make.
Well now, we have to start on a pixelsig.
How do you start to work on one?
Well, of course, you need an idea. Sometimes to just have a kickass idea fly into your mind. If that happens, sketch it out real fast, so later you still know what you wanted to create.
But in this case, I will use the idea of the customer. He has a certain idea in his head, and it is our task to convert this mind-image into something visual. Into a pixelsig.
In my case, the customer even supplied a little fast sketch to illustrate the placing of the characters and scenery.
He had the following thing in his head:

(The text is Dutch, and explains what the crosses are meant to be, as this is
just an example, it isn’t really needed to translate this.)
This signature is a signature meant to illustrate the fact that he is quitting RuneScape.
His retirement sig. The person in from of the window is him. The children represent the youth taking over the things he loved to do. The fishing kid stands for his love for the fishing skill. The dragon kid lays the connection with all the drops he has had, and the kid on the metal dragon, in combination with the Jelly and the clue scroll, are aimed at the clue hunting he did.
So, the idea is there.
Now, to decide on a size. You don't want to make everything too big, but you really don't want to make everything too small to detail properly.
Normally, I go for sizes about 400pixels wide, and 150-175 pixels high.
If you have certain defining aspects of the sig that are either quite wide or high, then pick a bit higher/wider size, but that's quite obvious.
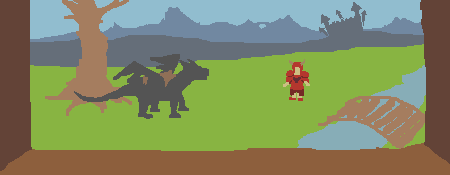
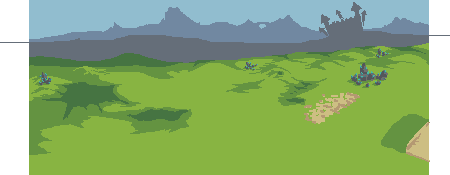
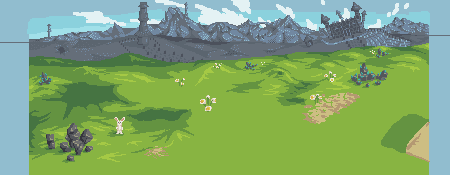
The Basic SetupThe technique I've used in this sig to make the basic setup, is painting in blotches of colour.
I pick a slightly bigger sized tool, like 3 to 5 pixels, without anti-aliasing of course, and I start to draw the different features in the sig.

As you see, I drew a grass-coloured foreground, a light blue sky, and 2 layers of hills/mountains in a blue colour.
The closer the mountains are to the 'background', the more sky-coloured they get. I have no idea what the term for this is called in English.
As you can see, I did not use very bright colours.
Most of my colours in my sigs are below a certain brightness, illustrated in the following image.

Most of the colours I use, are all on the left side of that red line you see. It doesn't matter whether it is green or red or blue, most of them are left of that line. It gives the colours a bit of a washed out, realistic feeling.
Sure, bright colours can be useful in some cases, and we will use them in this one too, but mainly for highlights and things like that.
Back to the sig.
As you may have guessed from the sketch the customer showed me, he wanted a Window-bank (I'm quite sure that's not the right word), anyway, the wooden stuff that is around/under the window, the window in this case being a glassless one.
So, I made it.
Here's where the layer function comes in handy.
I added a layer, and drew it on there. I had to correct some things, size mainly, after drawing the rest, so I was glad I made this on a separate layer. I only had to erase some part of this particular layer and I was done. No need to re-pixel the background, as it is on another, underlying layer.

Again, not too bright colours.
And here we also have our first small bit of shading.
As you perhaps can see, the darker colour used on the sides is not just a colour with the same tint, but a bit darker.
No, I also edited the tint. This is another aspect that makes pixel art look more realistic.

As shown here, not only do I drag the colour-circle-thingy more towards black, but I also change the tint on the colour wheel, more towards red.
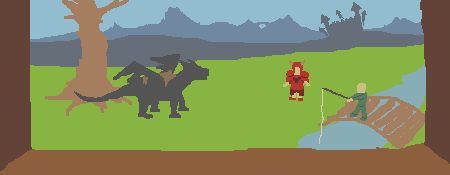
Now, I start adding objects to the scene.
The customer wanted a river with a small bridge, and a tree with a metal dragon tied to it. As the rope is more of a detail thing, I left it out for now. This is only the basic setup right?
For this, I added a new layer, underneath the one we just made.
Again, in a 3pixel sized pencil tool, I drew out the basic shapes of a river, a bridge, a tree and a (metal) dragon.

The brown thing on the dragon is a seat, because there will be a kid sitting on it.
For some small details which where needed, like the horns tail and seat, I used a 1pixel tool.
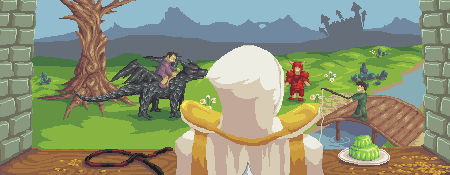
Next up, the character.
Again, just colour-blotching.
I added a new layer, above every other one, because the character is standing in front of the window.

The customer wanted the character to wear a prayer cape and hood, so hence the white-ish colour, as this is the main colour used in those items. Details like the trimmed things will come later on, no need to add them now.
And now it is time to add the three kids the customer ordered.
He wanted a kid in the middle with oversized dragon-armour on, a kid on the metal dragon, and a kid on the bridge, fishing.
For this, I added yet another layer, underneath the window bank one.
Because kids are so small, I used a 2pixel sized pencil here, plus a 1pixel sized one.
I disabled the layer we previously made, with the white character in it, to get a better view of the left-over space. In most programs with layer functions it will be something like clicking on the eye, or perhaps glasses. It makes that particular layer invisible.
I started with the kid in the oversized dragon armour.
This has some more details, because the armour consists of a few pieces, I had to add some defining lines, to make it clear. Real details still aren't there, like a face, and form, etc.
Next I added the second kid, the fishing one. Again. a few simple details de define his arm and such. Plus, the remaining one, the kid on the dragon.

And next, we switch the layer containing the white character back to visible again.

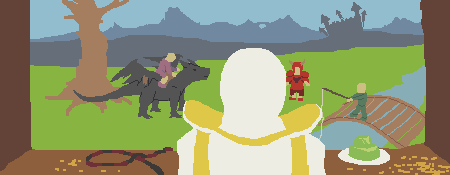
As the order stated, there have to be some items on the window bank. A whip, a white party hat and a few coins spread here and there.
Again, with a 2pixel sized pencil, I draw the items.

Alright, whilst I'm making this tutorial, I'm also chatting to the customer.
It often happens that the customer wants a change. Sometimes it's rather big, other times it's just a small edit. You have to keep that in mind. The customer is king, so just make that edit they want. This is where the layers also come in handy.
In my case, the customer wanted the party hat changed to a jelly on a plate. A jelly pudding thingie. To make the relation with the jelly-slayer monster on RuneScape.

Right, so, it's coming together nicely so far.
But, there is still some work to do before we continue to the next phase.
We have to refine our shapes.
You have to think about whether your objects are placed right, how is the composition working. Try moving around some things. If you don't like it, just put them back where they were.
Some things seem too thick, too thin, oddly shaped, or something near.
We are going to work on those things now. I took the 1pixel sized pencil tool, and started refining.

As you can see, I moved the white character up a bit, give him some more body. Plus I added the yellow/gold trims on the cape and shoulder-thingies.
Next up, the dragon.
I redid the feet, and wings mainly. I added a few darker lines to get the form down, where do the legs end, where does the body start, etc.

Oh, and while we're at the subject of lines.
Let's have a quick lesson about cleaning lines.When you draw lines with a 1pixel sized tool, you are bound to get double pixels.
Like so:

Do NOT, I repeat, DO NOT, make your lines like this.
You are going to want to use single pixel lines, like so:
This results in much cleaner lines, and a cleaner look overall.
Got that? Yes? alright, let's move on.
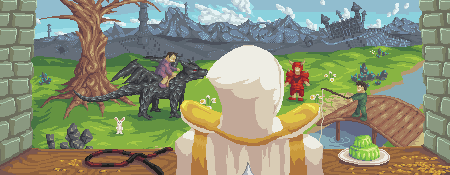
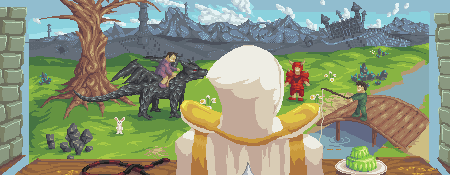
Back to the sig. This time the bridge is getting an upgrade.
And along comes the rest of the things left to fix. Tree and the sides of the window, plus the whip and the river, and some other minor things.

Alright! That's that.
Looks quite decent already doesn't it?
Seems like it is time to move on to the next, and the most defining step.
Shading.
Before you start shading, it is best to ask the customer whether he wants to see any adjustments, be it the composition, or the adding/removing of certain elements.
Read on in the next reply.
__________________________________________________________________
The shading.Right, before we start randomly shading everything, we need to think.
We are going to want to avoid pillow shading.
Pillow shading is the result of not thinking about your light.
You shade everything from outside to inside, from dark to light. This really does not help to create depth in a signature.
So, we need to think about the light source(s). The main one is the sun, most of the times.. In cave-esce scenes, you can use torches on the walls, or use a generic light source, in combination with the torches.
Magic spells can also be a source of light. To make spells looks good and magic-y, they need to emit light, unless you are of course casting something like a darkness spell, or perhaps creating icicles out of your hands.
But, in my case, the real light source is the sunlight. There are no torches or the like, the house where the character is standing in, is also lit by the sunlight, coming through a few windows, which cannot be seen in this sig.
So, this makes it easy, there is only 1 strong light source. Now, we have to think of the direction of the light. This will define where the shadows will be, and where the light-spots will be.
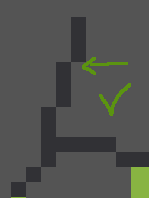
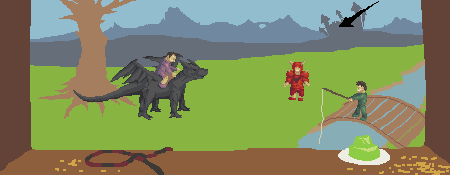
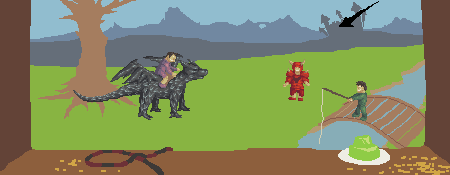
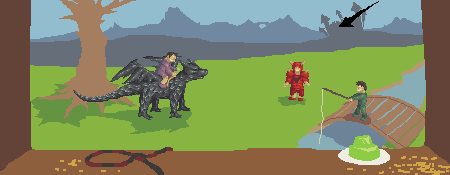
For most scenes, you are going to want to have the sun to be a bit above the horizon, not too low, but surely not too high. I often pick a spot somewhere above the edges of the sig. I'll show you.

The arrows represents the direction of the light. It is coming from the back, going forward under a slight angle.
To illustrate this a bit better, here's how an orb would be shaded.

Alright, so we have our light direction.
We could start shading now, ain't that right.
Yup, I guess so. Which means we will.
But before we shade, we are going to need colours. As I explained before, you don't just edit the colour and make it a bit closer to black. You also change the tint.

Let's start with one of the biggest things right away, the character.
As you shade, you need to consider form. You have your light source, now we have to think about forms.
The hood the character is wearing isn't just a round thing around his head. It has a slight pointy-form at the back. It's quite difficult to make it this way, because we are looking at the character right from behind.
That's why we are going to edit the hood a bit.
Let's make the character look to the right a bit more, so we get a bit different angle on the hood. This makes it a lot easier to shade.
So, it's finally time to start shading. We've got our light source, we've got our colours, we've got the shape of the hood in our head.
Now, considering the light source, try to imagine where the shadows are going to be. His back is definitely out of the sun, so we fill that with the darker colour.
His neck and lower part of the hood is also not lit by the sun. The hood has a little edge along the front side, a little round-ish edge, which needs to be shaded too.
The tops of his shoulders get some light.

Now, we add another shade. Another darker colour. Again, not only change the colour, but also the tint. I'm going a bit more towards grey this time.
The darker shade adds more depth.
The back of his neck gets very little light, so we add the darker colour here. His back/cape has to have some depth, so we add some darker straps of colour there. The back of his arms get the same amount of light as the back of his neck, so we're going to add the darker colour there too.

For now, 2 shades are fine. We will blend the shades later on.
As you can see, we haven't done the shoulder-things and the golden trims on the cape yet. I'm making them a bit curvy in the middle, a bit odd, bit I like it.
I used a few more shades for this, to make the shape of the shoulder things the way I wanted.

Now, I'm going to do the little guys. I'll start off with the one in dragon armour.
I made the layer with the character on it invisible again, gives me more room to shade.
You know the drill, not only change the colour, but also the tint.
And start defining those shapes. Shoulder pads are not flat are they?

And a little zoom, to show what I did, because this is already quite detailed.

Those are 5 shades used for the dragon armour, including the dragon on the chest.
Didn't really get the light source right on this one though. But we will see how it will fit in, later on. If it needs reworking, it will be redone.
Again, the chat with the customer brings in new updates.
I forgot to add the prayer symbol to the prayer cape. It should show a bit, just the top. It's good to talk with the customer while making the sig.
I know the prayer symbol on the prayer cape normally does not have a circle around it, but I added it to make it a bit more clear. The top of the prayer symbol alone was too odd, not clear what it was.

Alright, back to the little guys.
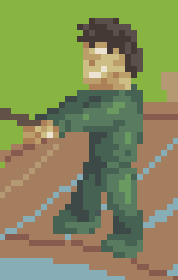
The fishing one now.
You should know how to roll about now.

Zoomed in:
And the last kid:

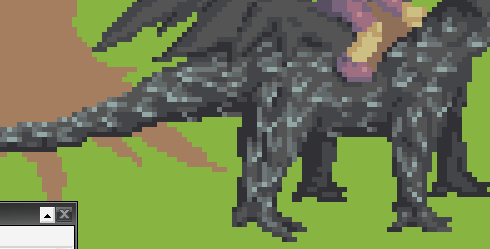
Time to do the dragon. This is a metal dragon, so we have to make scales. I've personally never done this before, so it might take a few tries.
First, I shade the shapes of the dragon. I will add the scales afterwards. This seems like the best approach to me.
Ok, that's the basic shading, look decent. Wasn't sure how to do the legs, but they turned out ok. Now that we have the basic structure of the dragon down, we can start adding highlights and scales.
What I did to start the scales off, is take a lighter colour, and draw the edges of the scales, so we get the directions right. I know metal dragons don't really have scales in RuneScape, but I'm making this my way. The metal dragons in RuneScape are made out of big ugly polygons. I could perhaps make it that way, and it is probably the way to go if you want accurate RuneScape images, but I choose to stay away from the mainstream RuneScape-style.

Now we need to shade those lines we've just added.
This is getting complicated now. We add a few shades here, one lighter as the highlight we've just used, and one in-between the highlight and the dragons base-colour.
Here's what I have after shading the lines:

And here it is zoomed in.
First, you add the lighter colour to a few of the pixels of each line.
After that, we take the other new colour, and try to blend the lines in with the rest of the dragon, by adding this colour to the sides and inside of these lines. It's rather hard to explain, but I hope you understand what I did to achieve this effect.
Let's also take a look at what I did with the dragons head.

I have added highlights to the facial structure, and to the horns. Metal has harsh contrast, light and dark often are used next to each other. You can perfectly see this in the horn. The lightest highlight colour is used next to the second darkest colour of the dragon. Zoomed out, it gives a shiny-metal effect.
Look at his lower jaw. His mouth.

See what I did to create a metallic highlight there? I added a single pixel line, going from normal colour, to lighter, lighter, lightest, and down again. It is also next to the dark line of the mouth, which gives it that metallic contrast.
On to the wings, same technique as used with the head.
Read on in the next reply
_________________________________________________________________
Now, the scales look too overpowering to me, compared to the forms of the dragon. So, we need to get rid of some of the scales, or at least make them darker.

Not very noticeable, but I also added a few darker pixels next to the scales. They make the scales pop out a bit.
Here it is zoomed in:

And yet again, chatting with the customer brings in new updates.
He wanted the circle around the prayer symbol on the cape removed. He liked it better without. The customer is king, so voilá, we remove the circle.

Oh and before I forget, the seat on the dragon.

I've re-used the skin colours here. I took the lightest and the second lightest for the highlights on the side of the seat.
Ok, so let's make these guys part of the surroundings. Right now, they seem to be floating. The way to solve this, is to add shadows on the ground.
So, we switch off the character layer again so we can see some more.
You pick a colour which is close to the grass colour, but darker, and in a slight different tint.
We go to the background layer which has the grass, and we start shaping those shadows on the ground. The tree makes a shadow, the dragon, the kids, but also the bridge on the water.
Now, we add another darker colour grass, to define the darker shadows, plus a darker shade of brown/red for the kid on the bridge.

Ok, time to give the tree and bridge some love.
Trees are hard to do right. They are not just a cylinder with some stick sticking out at the top. A tree has roots, branches, and has a organic shape.
Keep in mind you are pixelling a fantasy world, where almost everything is possible. Therefore, I've gone and created a very special tree. A very swirly tree.
Like this.
With another darker shade of colour, we can define more depth.

And now for some highlights, plus some more little fiddling with the dark colour.

Now, on to the bridge. The bridge has a problem as it is now. Perspective is slightly off. So, I erased a part of the bridge, and redrew it.
Like this.

Time to detail the bridge. Using the same colours as the tree, but in a different way. The tree relies on the highlights, the bridge uses 1 different colour compared to the tree, which is the highlight colour. The bridge looks a bit more bland. The bridge is processed wood, the tree is living wood. If that tree is still alive, lol.

Also note that I added another darker water colour under the bridge, as well as some wave-wrinkles in the water.

Now, you should know the drill by now how to shade. Pick the right colours, think about the forms of the object, and shade.
I detailed the front a bit more, the whip, jelly on the plate, and the coins.

Here's a zoomed shot, to show you what I did.
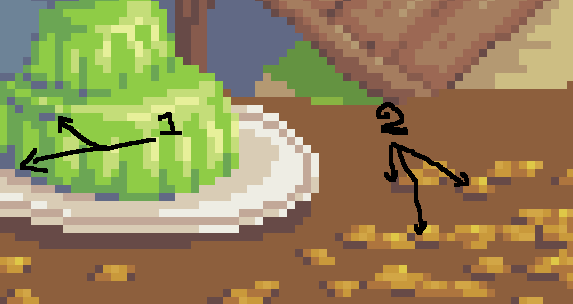
1: I added a bit bigger shift in tint this time, the jelly starts with a base colour green, and I used the darkest blue from the river to create the darkest shades of the jelly. Zoomed in it may look a bit odd, but zoomed out it looks good.
2: I added the same colour as used on the shadows for the whip on the window bank to add miniscule shadows for the coins. This gives them just that little extra depth to make them look part of the scene.
While we're working on the front, let's rethink the window bank thing.
Sure, the window bank itself is fine, but why are the walls next to it made out of wood? I think stone would look better, and gives us more opportunity to try something different. We've done wood.
So, let's make the wall consist of stone bricks.

You should keep the perspective in mind here. It doesn't have to be perfect, but don’t stray far from the right perspective, it will look odd.
I did my bricks out of my head, and I added the perspective lines afterwards. This isn't the way to go if you want accurate perspective but hey.

The individual bricks in the wall might be a bit challenging to do. Bricks are not flat. They're imbedded in the cement.
I solved it the following way:

Zoomed in, here you can see the little highlight on the top and front edges of the bricks.

On to the window bank itself now. Let's add some shadow at the edges. This helps it give some depth. Take a look.

Okay, since it is wood, it needs texture. Let's take a look at a wooden plank.
http://www.qualitycraft.ca/vinylplank_pi/2...gacyoak_500.jpgWe've got a similar plank like this, but without the deeper cuts and stuff in it. Let's assume our plank is flat. We are still going to need texture.
So, we take our pencil tool and use a size 2pixels. And simply draw the patterns on there.
If you've done the whole layer thing correctly, the pattern should appear on top of the plank, but underneath the whip and the character.

read on in the next reply.
_________________________________________________________________
Looking good so far.
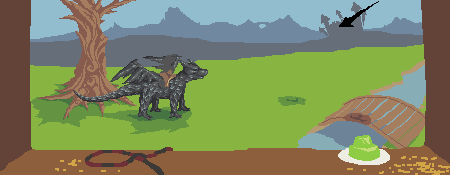
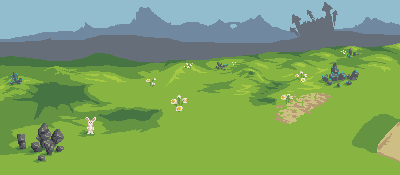
The background needs work. Let's start with the grassy field.
To get a good view of the background, we need to make the rest of the layers invisible. This is what you get when you do so:

We know where the shadows of the tree and dragon and such are, so we can take that into account.
Now, we need to fill up all that free space. Let's add some small hills at the back. And some rune rocks. Oh, and some sand at the end of the bridge.
May seem like a lot, and it is a slightly bigger step as we've some before, but you should know how to roll by now.
Ok, we need something besides the hills to fill it up. Let's add some grassy highlights and some flowers.

Looks better. Let's see how that looks with all the layers visible.
Alright.
Now, we need to fix that spot over there.

Ok, so after some fiddling here and there, it's almost fixed.
I added some rocks and a cute little bunny. Referring to bunny ears in RuneScape.

So, let’s add some of the grass highlight colour in there.
As you might have noticed, I also tweaked some other minor things, like the tree.
This is quite important for me, to have the freedom to edit what I want.
Don't set yourself silly rules like Oh I'm going to do the background now, and nothing else until it is finished. If you see some other things you might know how to improve, do so. It's my way of working, and I like it.
Ok, so now we've come to the background, the blue mountains.
Do not make this too crowded. It is the backdrop, you shouldn't be able to see a big load of details. Keep the colours close to each other, don’t make it too distracting. This does not mean however we should be sloppy with this part of the sig.
We are going to use the colours of the other layers of mountains and a few darker shades to create a smooth backdrop.
Like this:

Doing the backdrop really comes to fine detail. You are going to want to have some nice things back there, but you only have a few pixels to do it, and a few colours as well. This takes time to learn, but it is worth it. If you manage to do small things, bigger things will come out a lot better.

So, the first layer of the mountains of now done, I added a tower, which is repeated in the layer of mountains behind this one. We will make this into some sort of beacon-signal towers, like the flame-beacons in lord of the rings, up in the mountains.

Another big step, I did the whole back layer of mountains. Quite a lot of detail there. You have to define the mountains structure, it doesn't really matter if you're going a bit over the top.

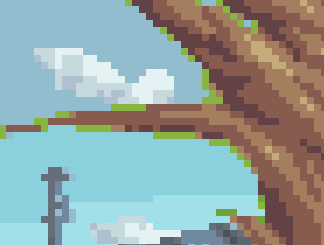
All there is left now, before we start the finishing touches, it the sky.
My last signature got too crowded because of the sky. That's why I'm going to keep it simple this time.
We start of by picking 2 extra, lighter and brighter colours as the current sky colour.
The sky should be on a separate layer.
About halfway through the sky, start filling it with the lighter colour, then as coming downwards, use the other, even lighter and brighter colour, so you have a sort of gradient going from bright to less bright starting at the horizon.
Next, we take a 2 pixel sized pencil, and take a colour very close to white, and start drawing the clouds. I drew the clouds with a direction, kind of bent around the shape of the earth. Gives the whole sky more depth. Going for puffy clouds.
Now take a bit darker cloud colour and start shading the clouds. Make sure the shading colour isn’t darker as the darkest sky colour.
After that, take some of the lightest sky colour, and start drawing around the clouds a bit. Not at all the edges, but just a few splodges.
Ok, so looking at the image, disabling some layers, I come to the conclusion that the walls and window bank take in too much room. So, with some selection tools, I take them apart and move them outwards a bit.
This leaves some free room, which means I have to re-pixel some things. No worry, it's not that much.
After touching up the things we had to add, we come to this:

Let's take a look at some of the dithering I used. I'm no expert, but I can use it.

That’s a standard dither pattern. This is controlled dithering.
I also use random dithering. Like this:
It starts with a regular dither pattern, but ends in random dithering. This gives it just that little transition.
Another chat with the customer, he wanted a clue scroll added.
So, I add a clue scroll.

Now, all there is left is some detailing in the grass, and texture on the stone wall, and some anti-aliasing done by hand.
Texture on the wall, is simple random dithering.

read on in the next reply.
______________________________________________________________
Alright, by adding 2 shades to the grass, I can get nice decent soft hills.
And now for the anti-aliasing.
This might be a bit hard. I will try not to add new colours, but use already used colours.
By anti-aliasing you basically make the transition from one edge of an object to something else a bit smoother.
Right now, if you look at the hood, you see this. Harsh pixels.

What we want to do is make these edges a bit smoother.
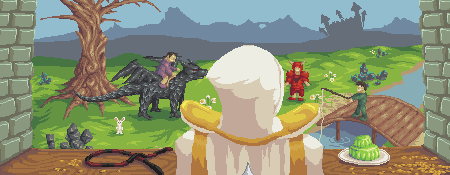
Alright, seems we're done eh?

Let's see how I did that AA (Anti-aliasing). Take the tree for example.
Yes, that is green. In close-up, it looks odd. When zoomed out, it looks normal. The green tint is in-between blue and the brownish red colour of the tree. The eye blends it.
Time to add the text and sell it to the customer

Don't forget the border.
Alright, that about raps it up.
I will add some minor small things later, like how to use certain techniques.
This was just a run through on how I did this sig, with some explaining alongside of it.
I hope you've learned something and enjoyed making it.
But keep in mind that this sig is in use by someone, so do not try to rip or recreate this sig. You can try to recreate it for practice purposes only, but do not sell it. Try to be original.
Thanks,
DementedHero


will look much better.. (if u arent avoiding black lines)
" ">
" "


 [/align]
 [/align]
 [/align]
 [/align]
 [/align]
 [/align]
 [/align]
 [/align]
 [/align]
 [/align]
 [/align]